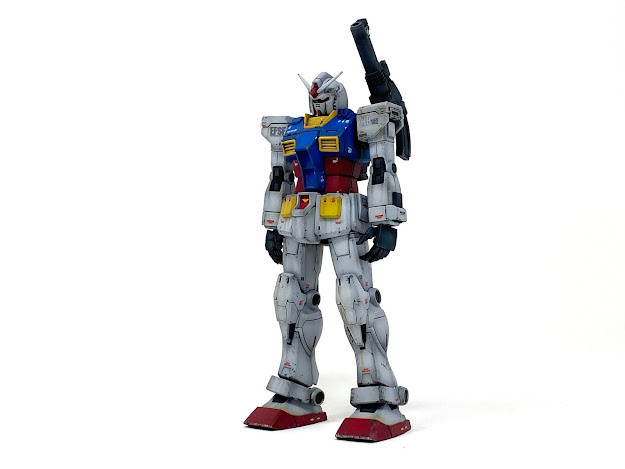
and Oh My God, what a kit this is.
Master Grade RX-78 Origin version was my favorite version of the granddaddy Gundam. It didn't have the core fighter but it had, in my opinion, the best looking RX-78. It looks like it is designed for war and not for style and I loved it.
The High Grade version follows. It kept the same looks and its same functions, making it an ideal kit if you want a badass looking RX-78 Gundam.
Starting from the box art.
Like the other HG Origin kits, it has the same CG anime style drawing of the kit. It shows Gundam in action as it stays up without fear amidst the explosion like the badass he is. This kind of box art will definitely draw buyers to this kit.
The kit includes a set of a small foil sticker for color correction, which is very minor. It also included a set of rear type stickers for its decals. I do wish they just include water slide decals, but I can only hope. At least its a close cut very slim real type stickers.
Building the kit was easy. It shares similarity as the GM Interceptor I have built but some parts are updated to accommodate new gimmicks like hidden thrusters in his leg.
The kit was designed very well. All parts came out of its sprue easily, and the nub marks were easy to clean, not to mention they were located in smart locations so it's very well hidden when assembled. I found very little flesh marks when building. The key part that surprised me was its head. The way its head assembles gets rid of the gap of the large part in the middle which most HG Gundam kits suffer from and when it's done, it looks like its one piece.
Overall, the build was a pleasant and easy experience.
Here is what the kit looks like when fully built straight out of the box without its sticker.
The bright white is different from the Master Grade version and honestly, I am not sure which one I like more. It really stands out though.
As you can see, the kit has a lot of small details, so it really stands out even from other RX-78 HG kits. The articulation is great, and I was able to make some awesome dynamic poses, although My favorite is the static pose with all its arsenals attached. It looks like fully loaded A-10 ready to bring pain to my enemies.
For painting, I used a new paint called Mecha Colors from Splash Paint.
It is a pre-thinned Lacquer paint. I was first made aware from NewTypeHQ Twitter so I purchased from them.
I am not fond of the pre-thinned paints because I can't adjust the paint based on the technique I will be using, but the price seems right and I wanted to try it.
The paint goes sprays on well. It hides the mistake well, and it goes on evenly. It took two-layer to go from gray primer to full white, and even for the white, spraying was easy. Unfortunately, the way I paint, I do gradient shading and it was a little hard to do it with this paint. it seems like it was formulated for even spray rather finer control. Still, with careful control of my airbrush and air pressure, I was able to get a nice shading.
You can see in the picture above, I was able to get subtle shading on each color. I am especially proud of how yellow came out.
The problem began when I sprayed topcoat. I used MR. Super Clear which is a lacquer based varnish. After I sprayed it, I realized that it re-activated the cured paint and lifted it. It changed from nice gradient shading to spotty mess, I had to repaint it. I also had a problem when panel lining with Tamiya Panel liner. The enamel thinner actually weakens the paint and it was rubbing off. Thankfully, my usual Vallejo Mecha varnish didn't have any issues, and it protected the paint well even from enamel thinner.
Other than that, I didn't have any issues with the paint itself. Once cured, its really strong and it resisted scratch very well.
I only painted one kit with this paint so I will hold my judgment, but so far I like it and I will continue to use it to see how it goes. I do wish their main paint like is as cheap as this mecha line. $5.99 I can do but $7.99 per bottle seems high.
I applied the included rear type stickers. I didn't want to pay extra for the water slide decals, and while I hate using stickers on the painted kit, I can tolerate these real type stickers as they are thin and are barely visible.
For weathering, I used oil paint for staining and streaks. I also used Tamiya Weathering Master.
And here is the finished kit.
Oh, I forgot to mention, the Gatling gun can be attached to its chest, making it looked like it popped out. Nice touch.
The kit is well engineered and well designed. It looks great even when built straight out of the box, and when painted, it just becomes epic. It has nice gimmicks, lots of weapons, it poses well, and looks badass like its ready to bring pain to its enemies.
My only complaint is the use of foil stickers in a few places. Still, its very small and very minor details its hardly noticeable.
For the price, you can't beat this kit. Also as a Gundam fan, you have to pick this one up. I highly recommend this kit.
Bandai you did a great job! After the last disappointment, you redeemed yourself. Now just make regular GM using this kit with lots of weapons.


No comments:
Post a Comment